What's new in YourTradebase?
Take online payments in the US, Canada and Australia
10 May 2021
We’ve been helping our UK customers to get paid faster for almost a year now, and we’re super-happy to extend that help to our customers in the United States, Canada, and Australia.
Get started taking online payments by visiting Settings > Take online payments.
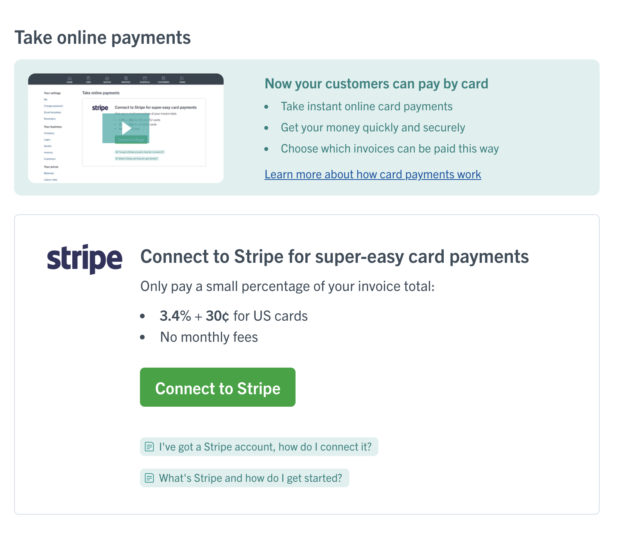
You’ll find more about taking online payments in our help section.
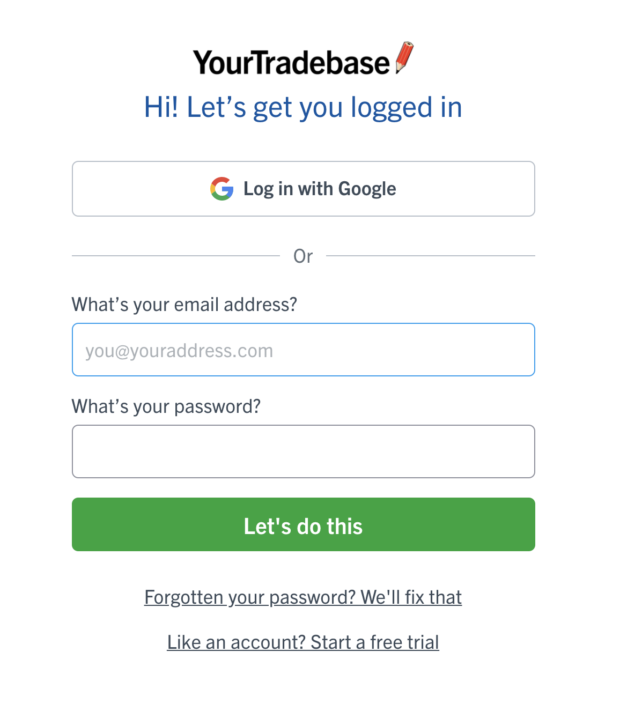
Login faster with your Google account
30 April 2021
Passwords can be a pain, so we’re happy to introduce Google Single Sign On (SSO) to YourTradebase.
If you’ve got a Google account, you can now use that to sign into YourTradebase. Just select “Log in with Google” when you next log in and – we’ll authorise your account with Google so you can log in without typing out your email and password each time.
It’s quick, easy, and safe – and means no more typing out long passwords when you want to log in! 🎉
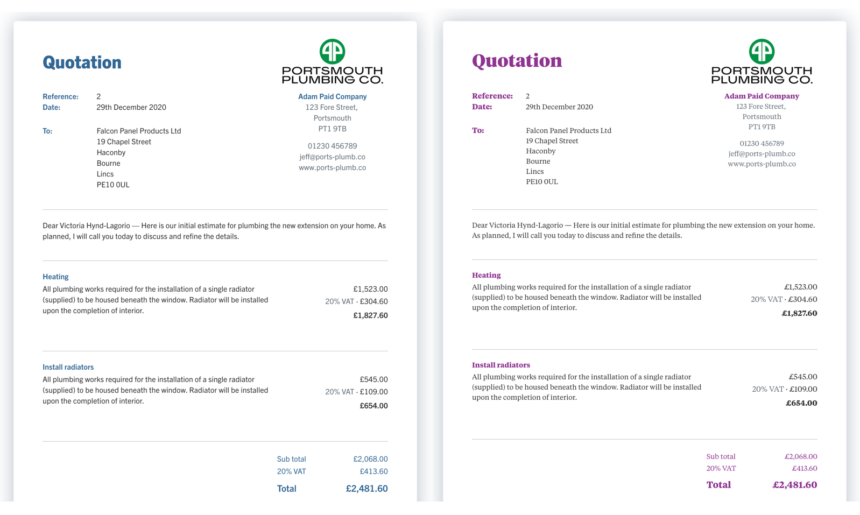
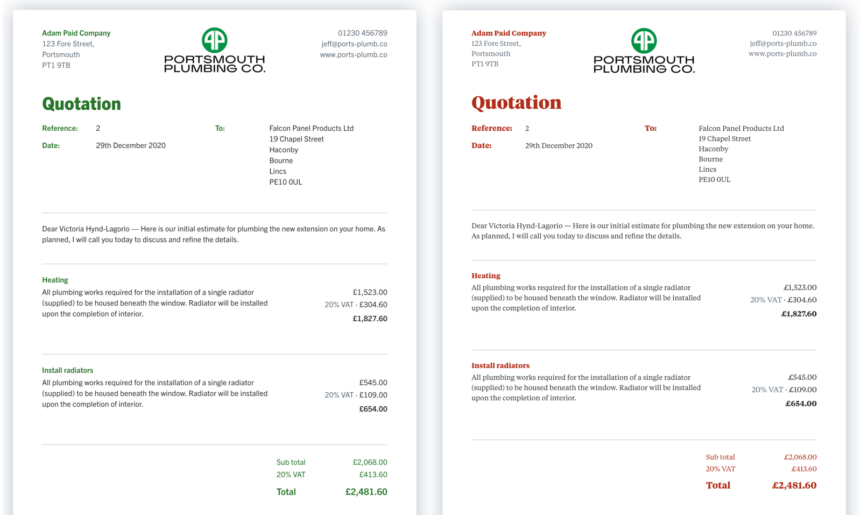
4 smart new looks for your paperwork
11 March 2021
You’ve probably got more urgent things to do than faff about with logos and layouts, right? We thought so. Which is why we’ve done it all for you. And today we’re launching four super-smart new looks you can add to all your paperwork in a couple of quick clicks.
We call them themes, and each one lays out your paperwork in a slightly different – but equally smart! – way. Just pick the one that feels right for your business. You can even choose your own colours, so you can tie them in with your logo, your van or your team’s work gear.
Here’s what they look like
Here’s how they work
- Open any quote, estimate, invoice, receipt or job sheet
- Choose ‘Customise’ then ‘Design’
- Pick the theme you want✌️Boom. Your paperwork gets a brand new look!
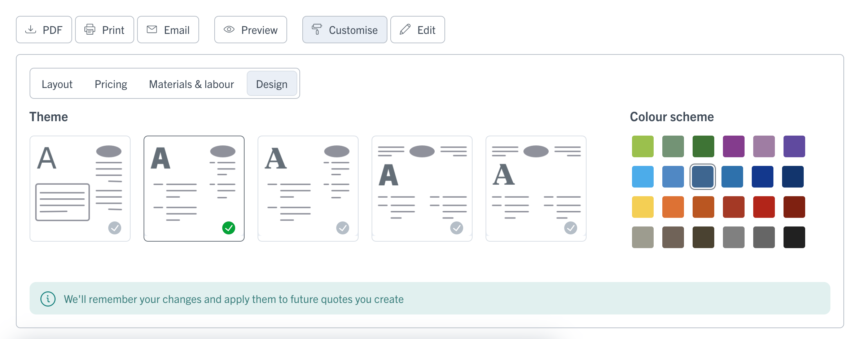
And that’s it. Once you’ve chosen your theme, it’ll automatically appear on all of your paperwork. Even better, we’ll remember what you picked, and apply it to everything new you do.
So, whether you’re emailing paperwork to customers, asking them to view it online or printing off a paper copy, it’ll look super professional, every time.
Job done.
Apply VAT reverse charge to invoices
26 February 2021
From 1 March 2021, the VAT domestic reverse charge starts in the UK… and we’re ready for it!
VAT can be complex and boring, but we’re here to make it easy 😎 Once you’ve switched VAT reverse charge on, you can apply it to your invoices with a single click.
If VAT reverse charge applies to you, just switch it on via Settings > Invoices > VAT reverse charge and then choose which invoices are subject to VAT reverse charge as you create them.
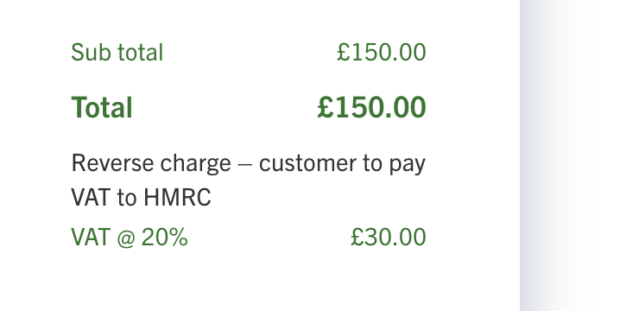
If an invoice is subject to VAT reverse charge, simply check the option under the invoice total and we’ll re-calculate the VAT and display a notice on your invoice that VAT reverse charge applies.
1. Turn VAT reverse charge ON…
Via YourTradebase > Settings > Invoices

2. Apply VAT reverse charge with a single click…
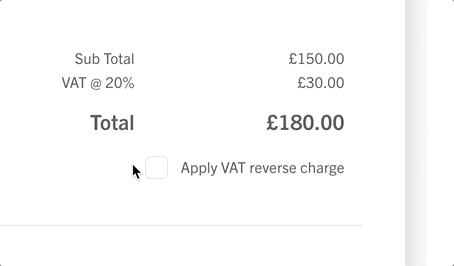
3. We’ll update the invoice totals and display a note to your customer…
More info on VAT reverse charge
You’ll find more details on how VAT reverse charge works in YourTradebase in our VAT reverse charge help guide.
Want to learn more about the VAT reverse charge? Check out our VAT reverse charge article for more.
Happy reverse-charging!
Unlimited attachment sizes
24 February 2021
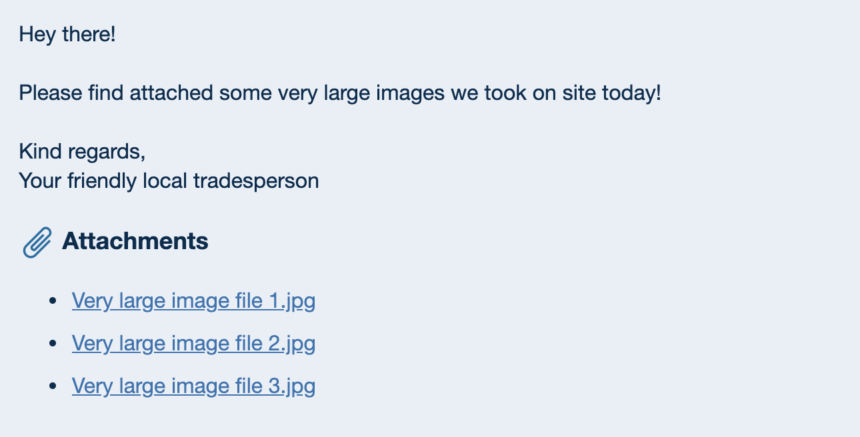
Want to send large file attachments to your customers? We’ve got you!
Today we’ve updated YourTradebase to remove the 10MB sending limit for email attachments 🎉
If your attachments are under 10MB in size, we’ll attach them to your email message in the normal way. Want to send more than that? Go ahead – we’ll turn those attachments into links at the bottom of your email, so your customer can click and open them that way.
Here’s how that looks:
Happy sending!
See your stuff, your way
8 January 2021
We’re kicking things off this year with a nifty new update. It’s all about giving you more control over how you view your jobs, tasks, quotes, invoices and customers. Let’s take a look…
When you’ve got a whole stack of stuff saved in YourTradebase, you need to find what you’re looking for, fast. So, we’ve been busy updating our main screens to help you filter, sort and see everything, just the way you want to.
Maybe you like your quotes listed in date order, your jobs sorted by start date, or your invoices arranged by reference number. We’ve all got our own way of doing things, and this update’s about giving you the freedom to work the way you want to. Here’s how…
Better filter options
Find customers, quotes, jobs, estimates and invoices faster with all filters available with just one click:
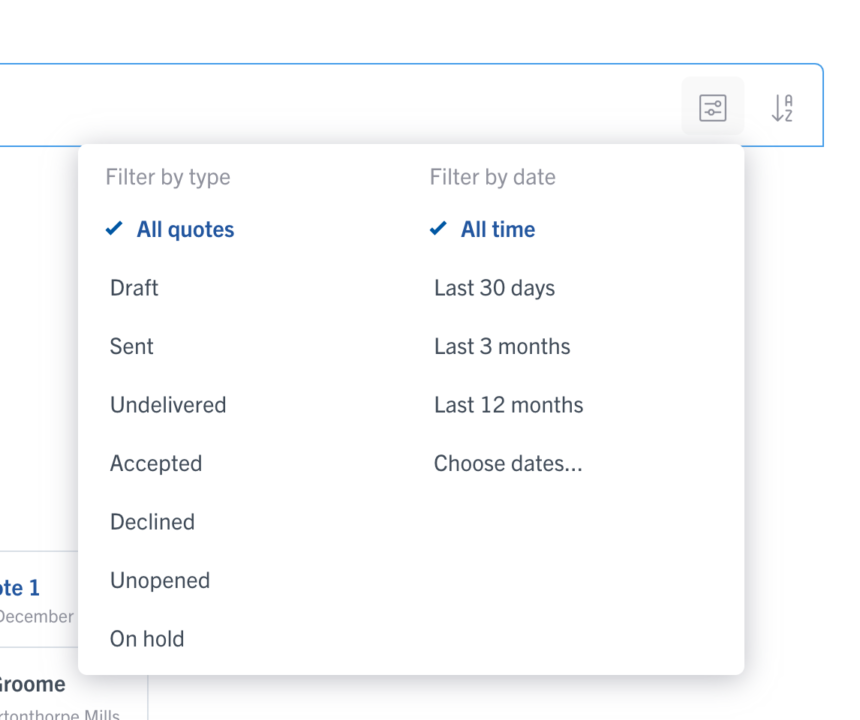
More ways to sort work
Choose the order you’d like to see things in – whether that’s by the date you wrote the quote, the date you started the job, the reference number or a whole bunch of other options.
Faster searching and filtering
Get straight to what you need, with speeded up search capabilities and even faster filtering.
Auto-loading, however long your list
See your stuff sooner, with auto-loading that shows your top search results straightaway, and loads more as you scroll.
Your preferences, remembered
Forget constantly re-entering filters and re-sorting lists. Just search, sort and view the way you want to, then we’ll remember your preferences for next time.
And that’s it. Smarter, quicker ways to get you to the stuff you need, again and again. Get stuck in and give it a go.
Happy sorting!
Smarter, faster, better paperwork – now live!
1 December 2020
We’ve been busy giving every piece of YourTradebase paperwork an upgrade, so you can knock out better-looking work, faster than ever. Time to take it for a spin!
We’re pretty excited about today’s update. Because we’ve been working our socks off to make every piece of YourTradebase paperwork quicker and easier to do – and better looking into the bargain. Nifty stuff…
So what’s new?
Auto-saving, so you never lose anything
We’ll keep your progress saved as you type, so you never lose any data as you work 🎉
Bold, italics and lists options in every doc
Easier text formatting – plus hyperlinks – for all quotes and invoices 🎉
(Much) faster systems for firing through work
We’ve made massive speed improvements – we’re super pleased with our super-quick paperwork, and we’re sure you will be too 🎉
Easier working straight from your phone
We’ve listened to your feedback and paperwork is much easier now from your mobile device 🎉
A smart new look, right across YourTradebase
Easier to read, easier to write – our all new paperwork-look 🎉
And more!
Plus we’ve done a whole bunch of work behind the scenes to make sure using YourTradebase just feels better too. Everything’s smoother, speedier and more intuitive, so you can blast through your admin in less time, with less head scratching.
Want to take our new paperwork for a spin? Just click the big Try new paperwork button next time you write a quote, estimate or invoice. It’s super easy to do, and you can switch back to the old system anytime you like.
Enjoy!
The YourTradebase mobile app is ready to install!
17 November 2020
Grab our shiny new app and get your hands on a truckload of faster features, wherever you are. It’s live in the App Store and Google Play today. Go, go, go!
You asked, we grafted. And now our No.1 most requested feature is live – the faster, better YourTradebase native app, designed specifically for your phone or tablet. It’s packed with all your favourite YourTradebase tools.
The new app taps into all the great functionality of your phone or tablet, letting you nip round faster and nail your paperwork in no time. And we’ll be adding a tonne of great new features over the next few months, helping you smash through that To Do list faster and feel super good.
Sound pretty handy? It’s all yours to download today on the App Store or Google Play.


Let’s do this!
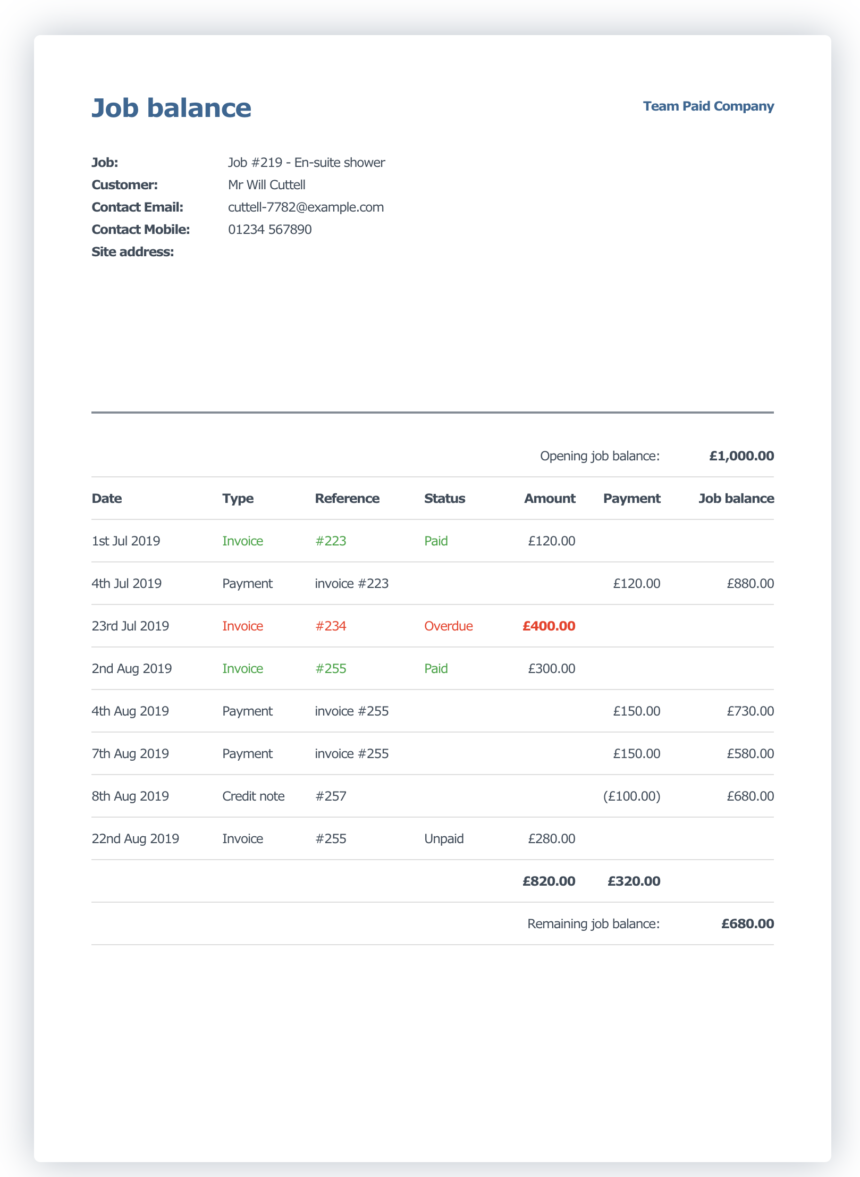
Know what you’re owed with job balance statements
10 September 2020
When you’re busy on site, it’s not always easy to keep tabs on what your customers owe. So, today’s update brings you a bang-up-to-date look at each job’s balance – handy for giving late payers a nudge, and keeping your cashflow healthy
Whether you’re juggling loads of jobs or chipping away at a long-running project, it’s good to know where you stand money-wise. That’s the idea behind our new job balance statements, designed to show you – and your customer – where you stand, at a glance.
They’re a great way to avoid confusion, keep customers in the loop and make sure nobody forgets to pay their bills.
Even better, they’ll show what a super-organised pro you are.
How do they work?
Whenever you win a job, or get a quote accepted, we’ll automatically set up a job balance statement, showing the budget for the job.
Then, whenever you send an invoice, get a payment or give a credit note, we’ll automatically update what you’re owed, so you can see what’s still due (or overdue) and when it should be paid.
And if a job changes scope once it’s started? No problem. When you send an updated quote, we’ll automatically add any extra costs to your running total too.
Where can I find them?
You can take a look at your balance statement for any job, any time. Just go to Any job > Invoices > View balance statement.
They’re quick and easy to view, download and print – and if you need to give a customer a nudge, you can email them a copy in a few quick clicks.
What do they look like?
Here’s a quick example…
Sound good? If you’ve already got jobs on the go in YourTradebase, you’ll find real-life job balance statements for everything you’re doing right now, just by going to Job > Invoices > View balance statement. Jump in and take a look.
Happy balance checking!
Keep your team in the loop with files and notes
13 July 2020
If you’ve got busy teams on multiple sites, keeping everyone in the loop can be tough. After all, you can’t be everywhere, all the time.
That’s the thinking behind today’s update – a nifty new way to get your teams totally up to speed, and help your jobs run like clockwork…
Wherever they are, whatever they’re working on, teams work best when they’ve got the very latest information right at their fingertips.
So let’s give it to them.
Share files with your field team.
From today you (or your admin team) can choose which job files you want your field team to be able to see, when they’re out on site.
Maybe they need the measurements you’ve taken, the spec you’ve agreed, or the delivery details for the latest load of timber, tiles or tools. Whatever it is, you can share it with them in a couple of clicks – and they’ll be able to open it in YourTradebase, on their phone, anywhere.
Just choose who to share each file with:
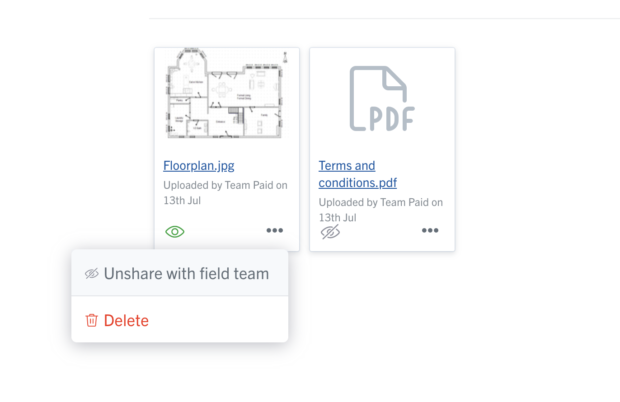
And they’ll be able to open up all the info they need.
Field teams can upload files and add notes, on site.
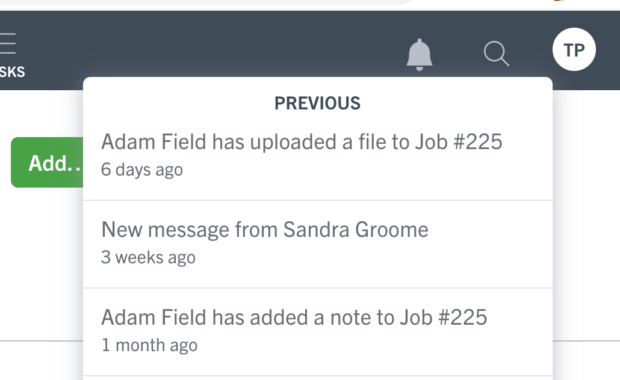
But that’s not all. They’ll also be able to add their own notes, files and photos to the job, giving you eyes and ears on every project, even if you can’t be there in person.
Whether they want to show you the progress they’ve made, flag up something unexpected or just keep track of customer requests, it’s really quick and easy to do – and share with you.
Even better, every time someone on your team adds a note or uploads a file, we’ll make sure you (or your admin team) get a heads up. You’ll get an in-app notification, so you can pop open the file, see what’s happening, and do what you need to do. It’ll look like this:
So, there you have it. A super simple, easy way to share need-to-know info with your hard-grafting team.
Ask your customers to sign online
9 June 2020
When a customer gives you the go-ahead, it’s good to know they really mean it. Which is why we’ve added a nifty new update to YourTradebase. It’s a quick, easy way for customers to add their signatures when they accept a quote – sealing the deal and giving you extra peace of mind.
We’ve all been there. A customer says yes to a quote, then they go quiet, put the job off, or change their mind completely. It happens. But for trades, it makes planning pretty tricky. Which is why we wanted to give you an extra way to pin people down – and get great jobs in the bag.
Here’s how it works. From now on, whenever you send a quote in YourTradebase, you’ll be able to choose whether you want the customer to sign when they accept it. There’s a quick tick-box at the bottom of the quote – just tick or untick it, depending whether you’d like them to sign on the dotted line. Let’s take a look…
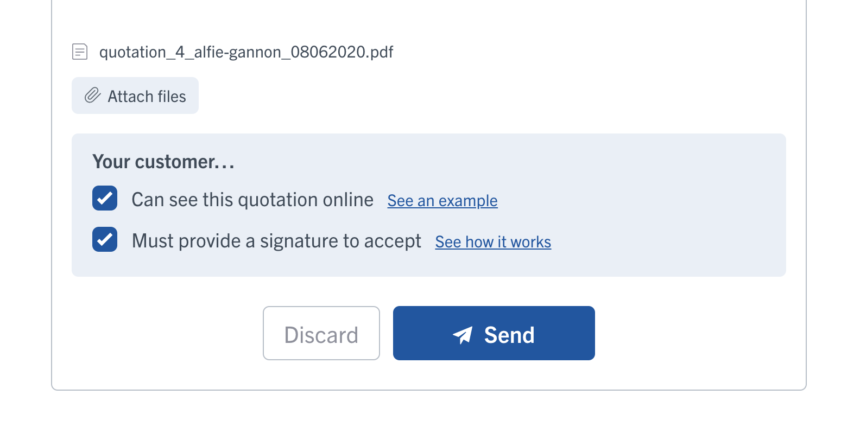
If you tick to say you want a signature, we’ll put a box like this at the bottom of the quote…
If your customer’s looking at their quote on a computer, all they’ll need to do is click the mouse, hold and draw. And on a laptop or tablet, they’ll just use their finger to squiggle. It’s quick, easy and pretty much like signing for a parcel. Here’s one we signed earlier…
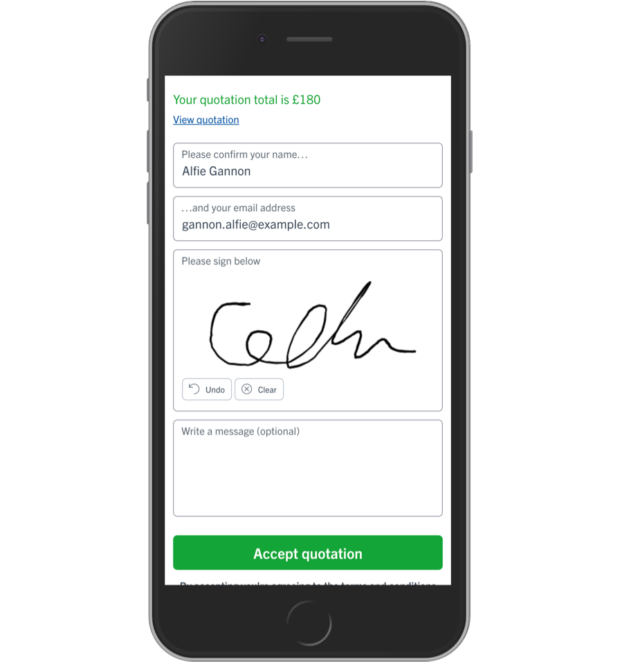
Once they sign, we’ll send a copy to you and save the signed quote in YourTradebase so you can look back at it whenever you need to.
It might be that you want a signature every time – or just when you’re working with new customers or on bigger, more expensive jobs. Whatever works for you. Of course, there’s no guarantee your customer still won’t do a disappearing act, but this is a quick, easy way to ask for a bit more commitment, and make sure they’re really serious about bringing you in.
Take it for a spin, we think you’ll like it!
Find previous job addresses super fast
14 May 2020
Save time, type less and find the addresses you need faster with our latest update…
We’re always looking for quick, easy ways to shortcut your paperwork and help you get on with the stuff you’d rather be doing. So today we’re launching our latest update – a small change that’ll save you time, again and again.
From now on, whenever you set up a job, track a lead or write a new quote or invoice for a customer you’ve worked for before, you’ll be able to pick from all the addresses you’ve previously entered for them.
Just tap on the address you need and we’ll drop it straight in.
There’s even a quick search function to help you find the right address fast – handy if you’re working for a bigger contractor or developer with stacks of work sites.
No more hunting around for scribbled notes, re-typing the same thing, or making unnecessary mistakes – just fast, accurate address finding, every single time.
Happy time saving!